http://kagefow.blogspot.com/2011/01/konigstiger-tutorial-part-i.html
I use to do the decals before highlighting but, the highlight seemed to catch the edges of the decal and I don't like that. So I'm going to try it in a different order. We'll see how it works out.
First thing, is do your own research. You'll be sorry if you don't. Especially if you are trying to build historical units. For example when I started building my Panzergrenadier Halftracks the decal has unit symbols. And it lists one of them as the 17th pzdiv and another one as the 3rd pzdiv. Well they had the designations backwards. So, because I wanted build 17th PzDiv halftracks, if I had not done my own research my halftracks would have had 3rd PzDiv symbols on them.
I like to use Micro Sol and Micro Set for my decals. As I mentioned before I used to do a varnish before I did highlighting and decals. That is because when ever I painted on a gloss varnish or the micro sol, it would wipe off the paint that was already there. what a piss off that is. But since the wash uses mostly future floor polish this gives your paint some protection already.

You will then need a small bowl of warm water. Carefully cut your decals out and put them in the water 1 or 2 at a time. NEVER put all your decals in the water. I've read where some guys say to do this in their tutorials. I can't stress this enough NEVER NEVER NEVER. In my experience if you leave the decal in the water to long it will float right off the paper and good luck trying to get it out and on to your tank properly.
While your decals are soaking, brush on some Micro Set to the area where you are going to apply the decal.
With that same brush gently brush your decal in the water to see if it will slide off. Once its ready take the decal out and dip your brush into the Micro set. with that brush slide your decal into place and brush it with some more micro set.
Next, take a stiff Q-tip. The reason I say stiff, is because if its too fluffy or fiber parts will stick to your decal. I usually pull all the fibers tight, and then gently press it against the decal. This should get all the air bubbles from behind the decal.

Once you have done another decal or 2 go back to your original one. Check to see if you can see any silvering. If you can take a pin and poke small holes.
Whether you find any silvering or not apply some Micro Sol to the decal, and press a little harder then the first time with a new Q-tip. I never use to think there was a difference between Micro Sol and Micro Set. I actually always thought Micro Set worked better and I stopped using Micro Sol. Until I did this Konigstiger.
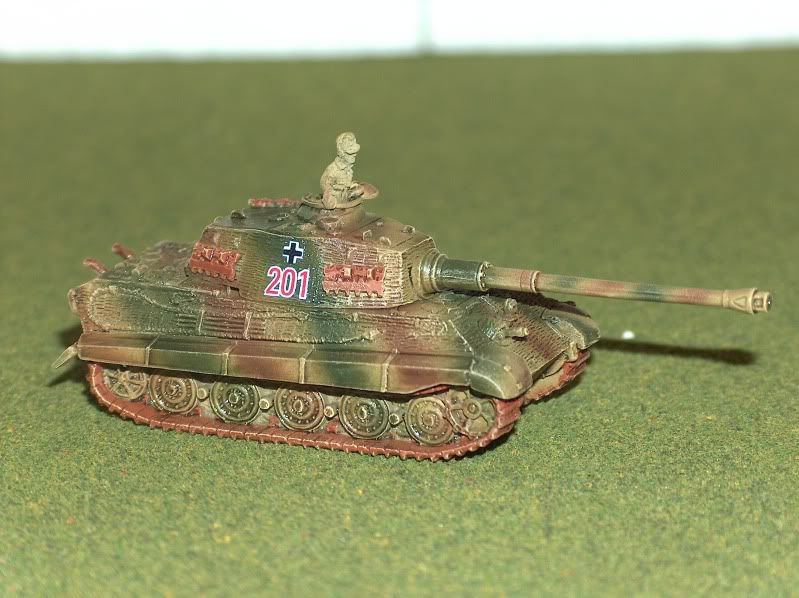
This tank was the first tank I've painted with Zimmerit. I was very nervous about doing decals on this stuff. I thought it was going to look terrible. And after adding Micro Set it looked like I was going to be right. But then I added micro Sol, and the decal conformed right to the Zimmerit.
Do all your decals this way and they were turn out great. This could probably be a tutorial all its own. Maybe I will do one with pictures.
Step 10 - Detailing

First I give my tracks a thick dry brush. I used to use black, but someone mentioned using German Grey. So, I tried that. Then a very fine dry brush of gun metal. This should give your tracks a very nice dirty rusty appearance, but still looking metal. You should have rust, black in the creases from the wash, and then the gray and silver. I find tracks make your tank, no matter how nice you paint your tank, if you just paint your tanks black or silver, it makes them look too clean.
Next, detail everything on the tank. Tow cables, tools, engine deck, what ever stands out on the tank.
I paint tow cables black and then do a very very small highlight of gunmetal.
Tools I'll do beige brown handles and then gunmetal on the metal parts. Some times these can be the most painstaking. There is almost always "handles" or something that holds the tools to the tank. these should stay the same color as the tank so you have to be carefully to paint around them.
The engine deck (or fuel tank on Russian tanks) you can do another wash to give a grimy look. I just starting trying to do oil and rust stains. take a wash on a stiff brush apply it and then do a rough motion downward. This will give a "leaky" impression. Nothing like this on the Konigs so another tutorial for another dirty tank.
Step 11 - 1st Matt Varnish
Here I do a quick Varnish before weathering same as the main formula in step 13 below.
Step 12 - Weathering

For damaged parts, I will take 2 parts black and 1 part earth brown. brush it on damaged parts. then with a white pencil crayon I will highlight edges of the damage. You have to be very careful about this. I find that the pencil will sometimes rub paint off down to the metal. which doesn't look to bad actually, sometimes. I guess maybe a case for doing that middle varnish stage.
 I tried adding dust to 2 of them. I used artists chalk for this and stipple it on with a stiff brush. I stopped doing this because the Aerosol varnishes used to turn the dust wet and it looked like crap. It didn't even look like mud, it just looked crappy. But I thought I would try it again now that my airbrush formula is Uber Flat. It seemed to work ok, but I may have to try using more because it disappeared in the varnish step below. You for sure can't see it with the camera.
 Take some German gray and lightly dry brush the end of the gun barrel. Another first on this project for me I tried doing this with an airbrush this time. Worked out ok.
Normally I put mud on my tanks but, I don't think I'm going to do that with these. That may have to be a tutorial for another day.
They turned out pretty well, so I may leave them as is.
Step 13 - Varnish {only 13? Seemed like a lot more}

I had just as many problems with aerosol varnish that I did with primer. And there was no way I was going to brush it on. So, when I got my airbrush I was determined to varnish through that. When I asked around, the general concession was that it wasn't possible or a good idea with out ruining your brush. It sounded like no one did it. After a lot of searching of the great wide web I came upon someone who did it for model airplane or something. If I can remember where and who it was I'll post link....but:
His formula when through the airbrush alright but it didn't really work. My models where still shinny. So, after much refining and testing I came up with my own formula.
- 3 parts Tamiya XF - 21 Flat Base
- 3 parts Tamiya XF - 22 Clear Base
- 5 parts Future Floor Polish.

The key though is the Flat Base, but it is also the downfall of this formula. The flat base takes all the shine off your model. How ever it almost does its job to well. So far I find you loose a lot of your highlighting and wash effects. This could still be partly that my wash isn't dark enough and my highlight isn't light enough. but I'm slowly working on those. It also leaves a tiny bit of a white film, but from what I've read so do other aerosol varnishes. Its defiantly far less then some of the aerosol varnishes I've used so I'm fine with it.
Because of these downfalls I've tried to scale back the flat base even just a little bit. I've found even if you remove 1 part of flat base, the model is still to shinny.
But I would give it at least 2 light coats.
Conclusion

I'm defiantly not the be all ends all for painting...far from it, but you can defiantly apply this to any tank. I've found following anyone's tutorials even to the letter never works.
When I first tried doing a wash, because I was sick of my crappy dry-brushed models I tried following this tutorial.
http://www.flamesofwar.com/Default.aspx?tabid=126&aff=10&aft=184284&afv=topic
There is no denying how good these tanks turned out, but i'll be damned if anything he did works for me. I followed his Wash formula to the letter. My first try turned out almost black.
So, take what I've done with a grain of salt. If you are a beginner looking to improve, I think I'm at that stage where a beginner could take that first step to becoming a great painter.

Shoot me a message if you have any questions, want some clarification or even have ideas of how I can improve my techniques.
Happy Painting!
Kage
No comments:
Post a Comment